 Psychological Studio
Complete Visual Guide
01
Play & Stop Controls
Main playback controls

The main playback controls allow you to start and stop your music. The Play button begins playback from the current position, while the Stop button halts playback and returns to the starting point. These controls are essential for previewing your work and testing arrangements.
02
Recording Interface
Start recording your audio creations
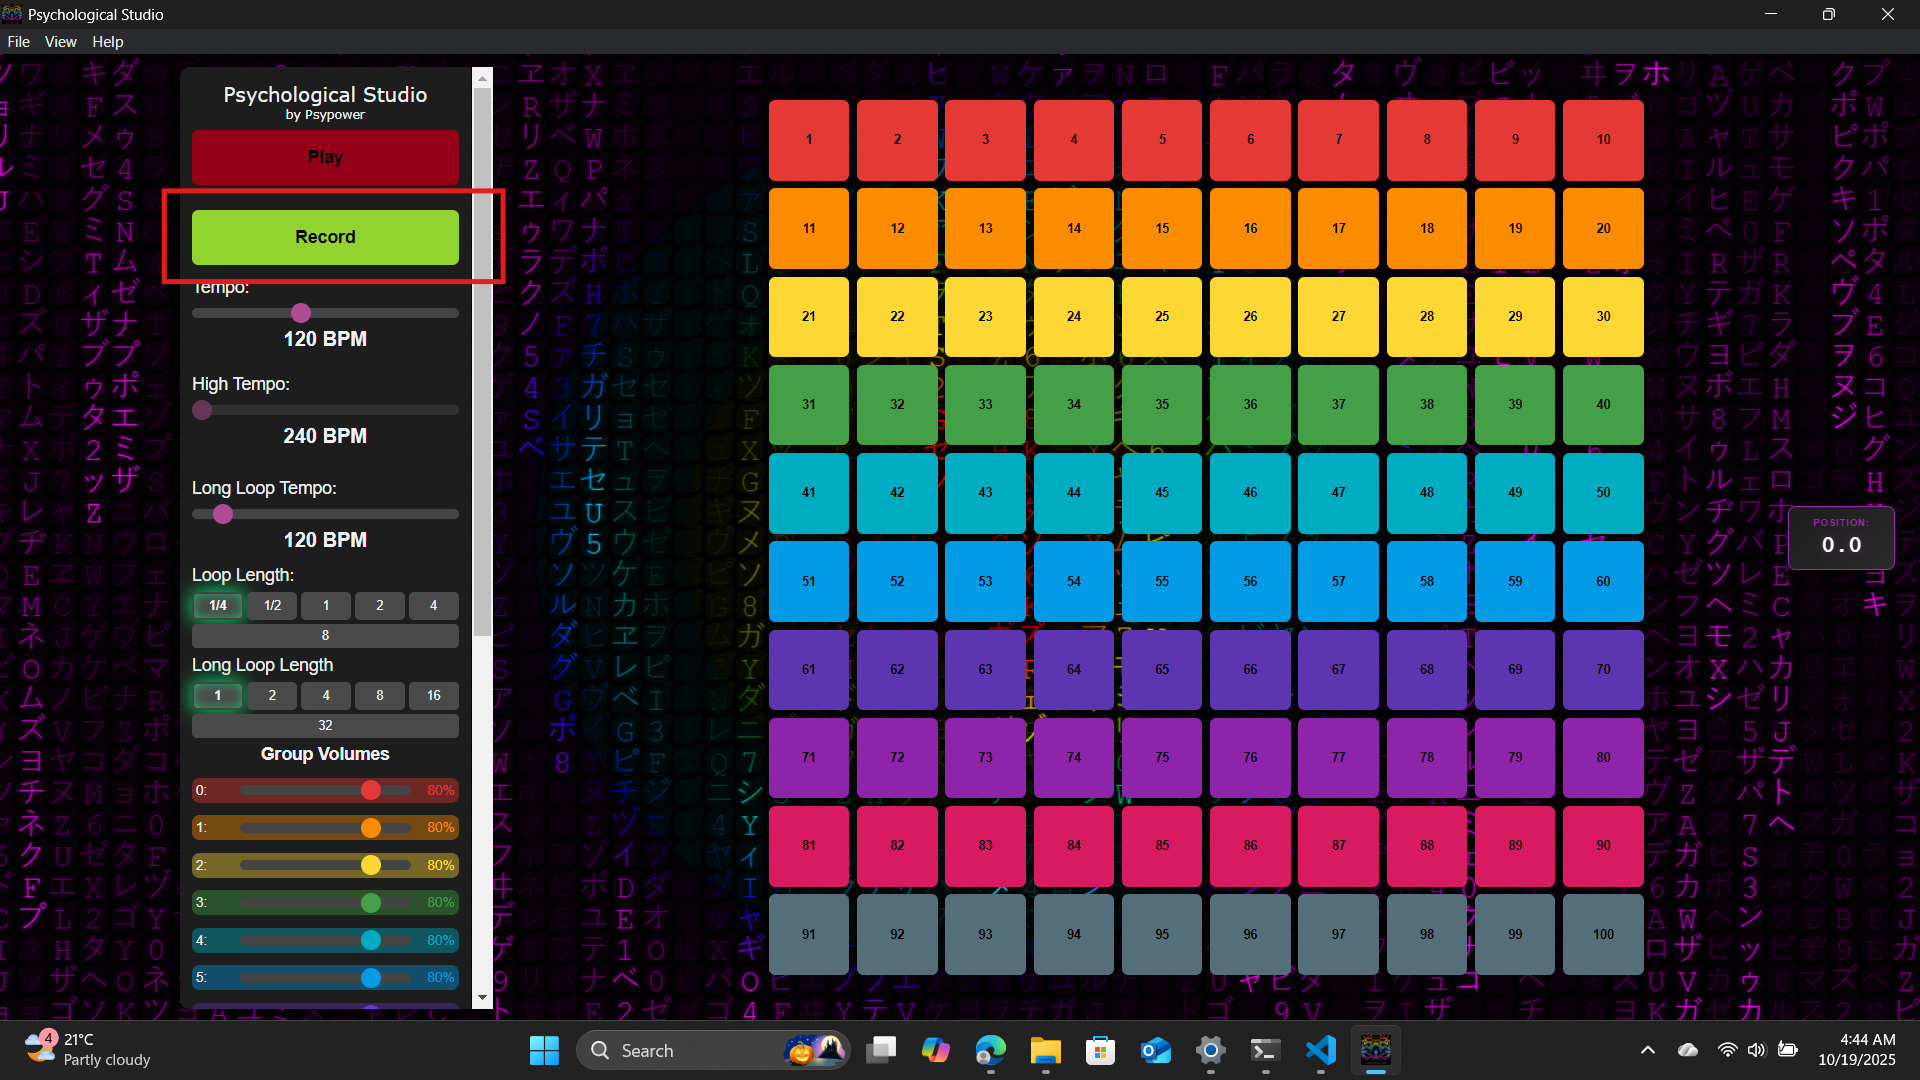
The Record button enables you to capture your performances in real-time. Click this button to begin recording audio from your selected input sources. The interface provides visual feedback when recording is active, helping you stay in sync with your creative flow.
03
Stop Recording & Save
Finish recording and preserve your audio

After capturing your performance, use the Stop button to end the recording session. The Save will download the recorded session to your device!.
04
Button groups
Open the timeline and arrangement workspace

The Buttons are in groups of 10 and 1 can be played from a group at a time. This allows for quick access to different samples, enhancing your workflow and creativity.
05
Volume Groups & Project Management
Master controls and project save/load functions
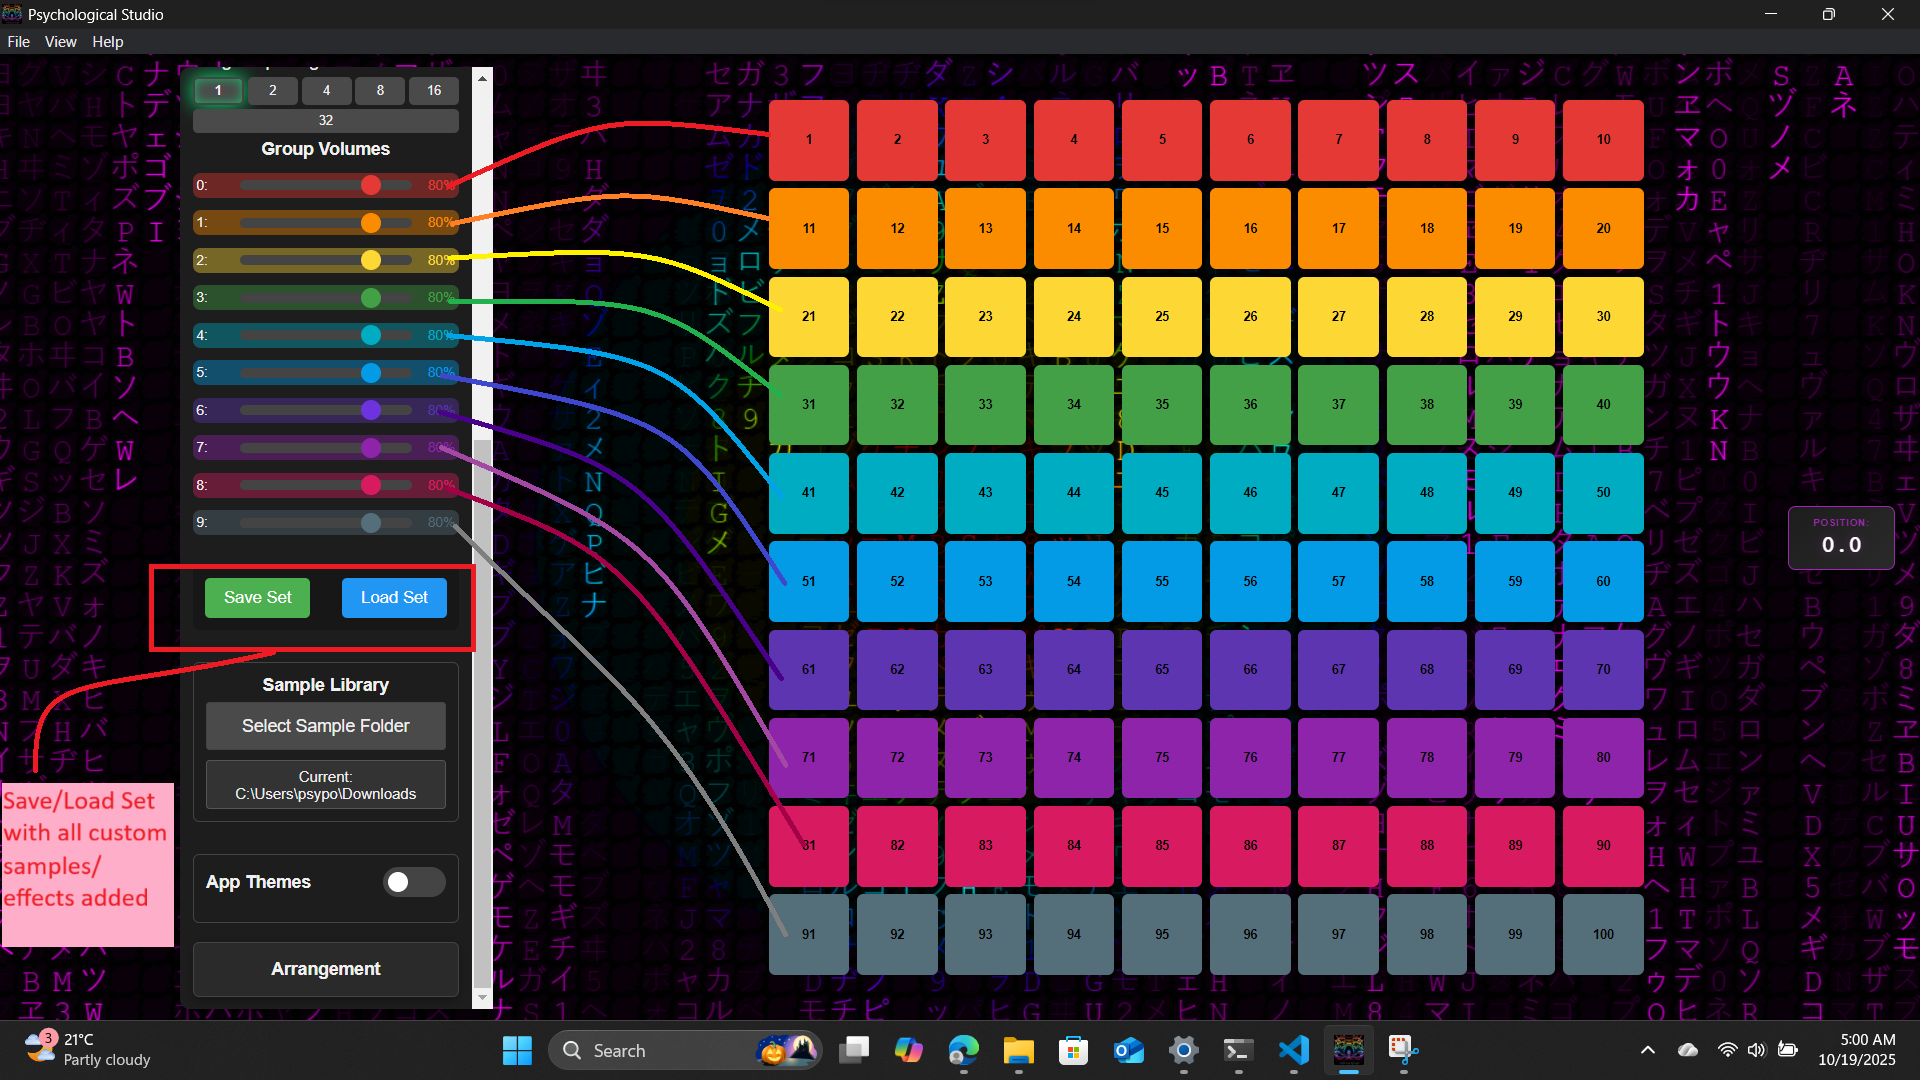
Manage your mix with group volume controls and save your projects for later. The volume groups allow you to control multiple channels together, while the Save and Load buttons ensure your work is never lost. Projects are saved with complete audio backup folders, preserving original quality.
06
Tempo & Loop Controls
Adjust the speed and timing of your music
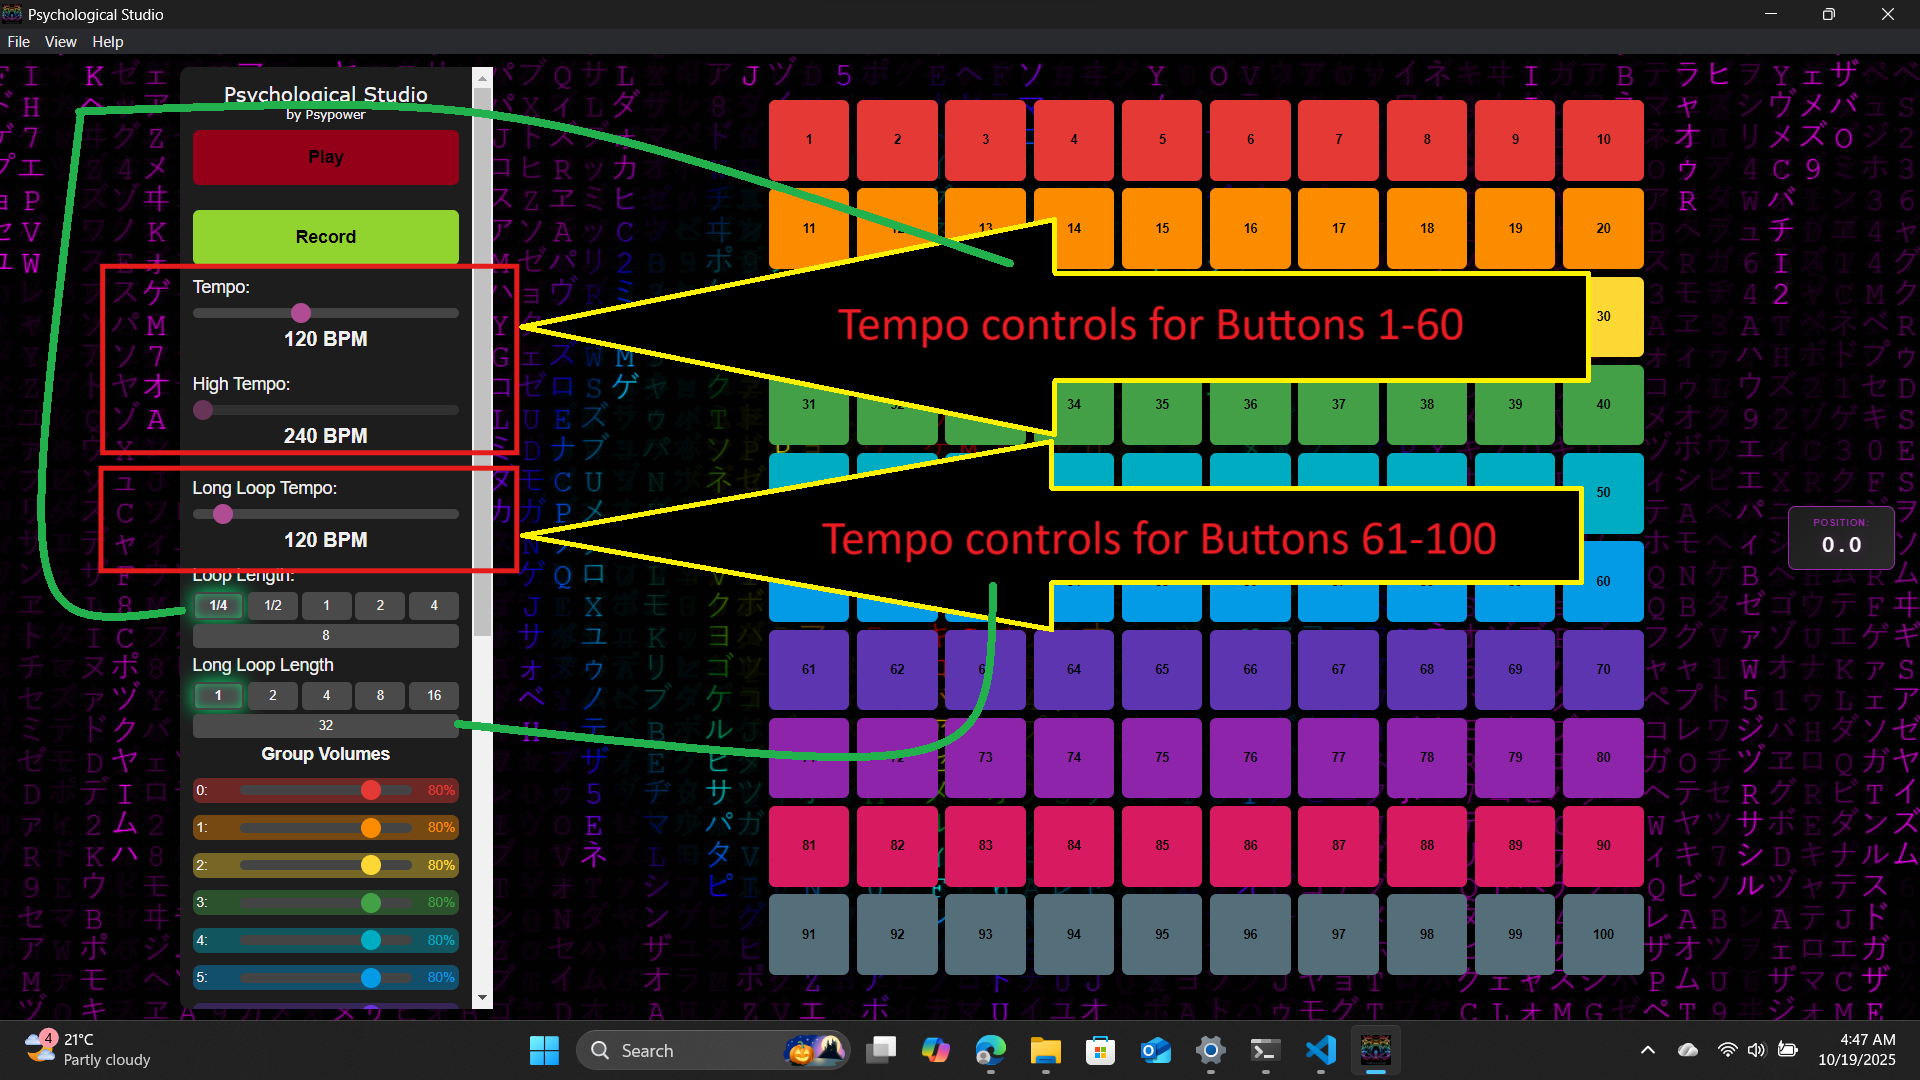
Fine-tune your track's tempo with precision BPM controls. The tempo slider allows adjustments from 40 to 1000 BPM, giving you complete control over the pace and energy of your music. Perfect for matching specific genres or creating tempo-based effects.
07
Effects Section - Master Delay
Delay and echo effects
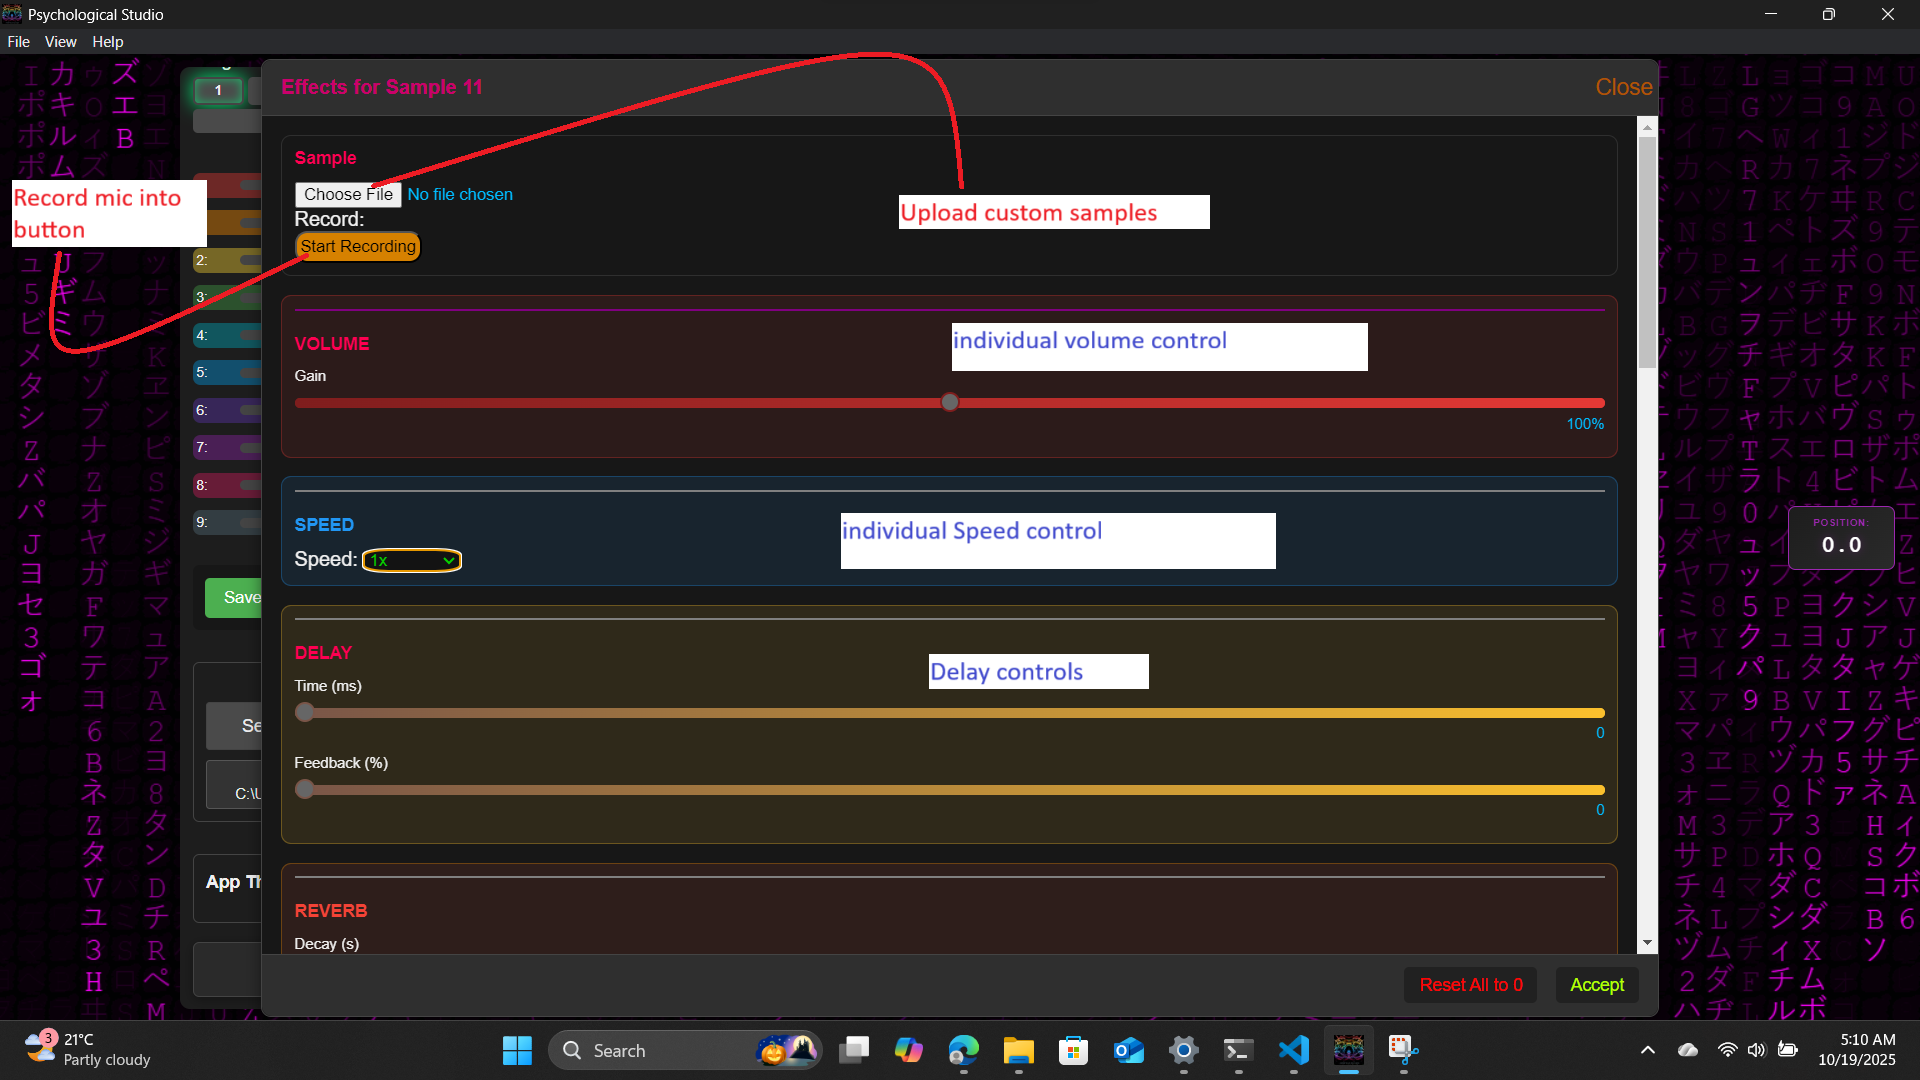
The Master Delay section provides rhythmic echo effects across your entire mix. Control delay time to create everything from subtle slapback echoes to spacious ambient repeats. Perfect for adding depth and movement to your productions.
08
Effects Section - Master Reverb
Room simulation and spatial effects
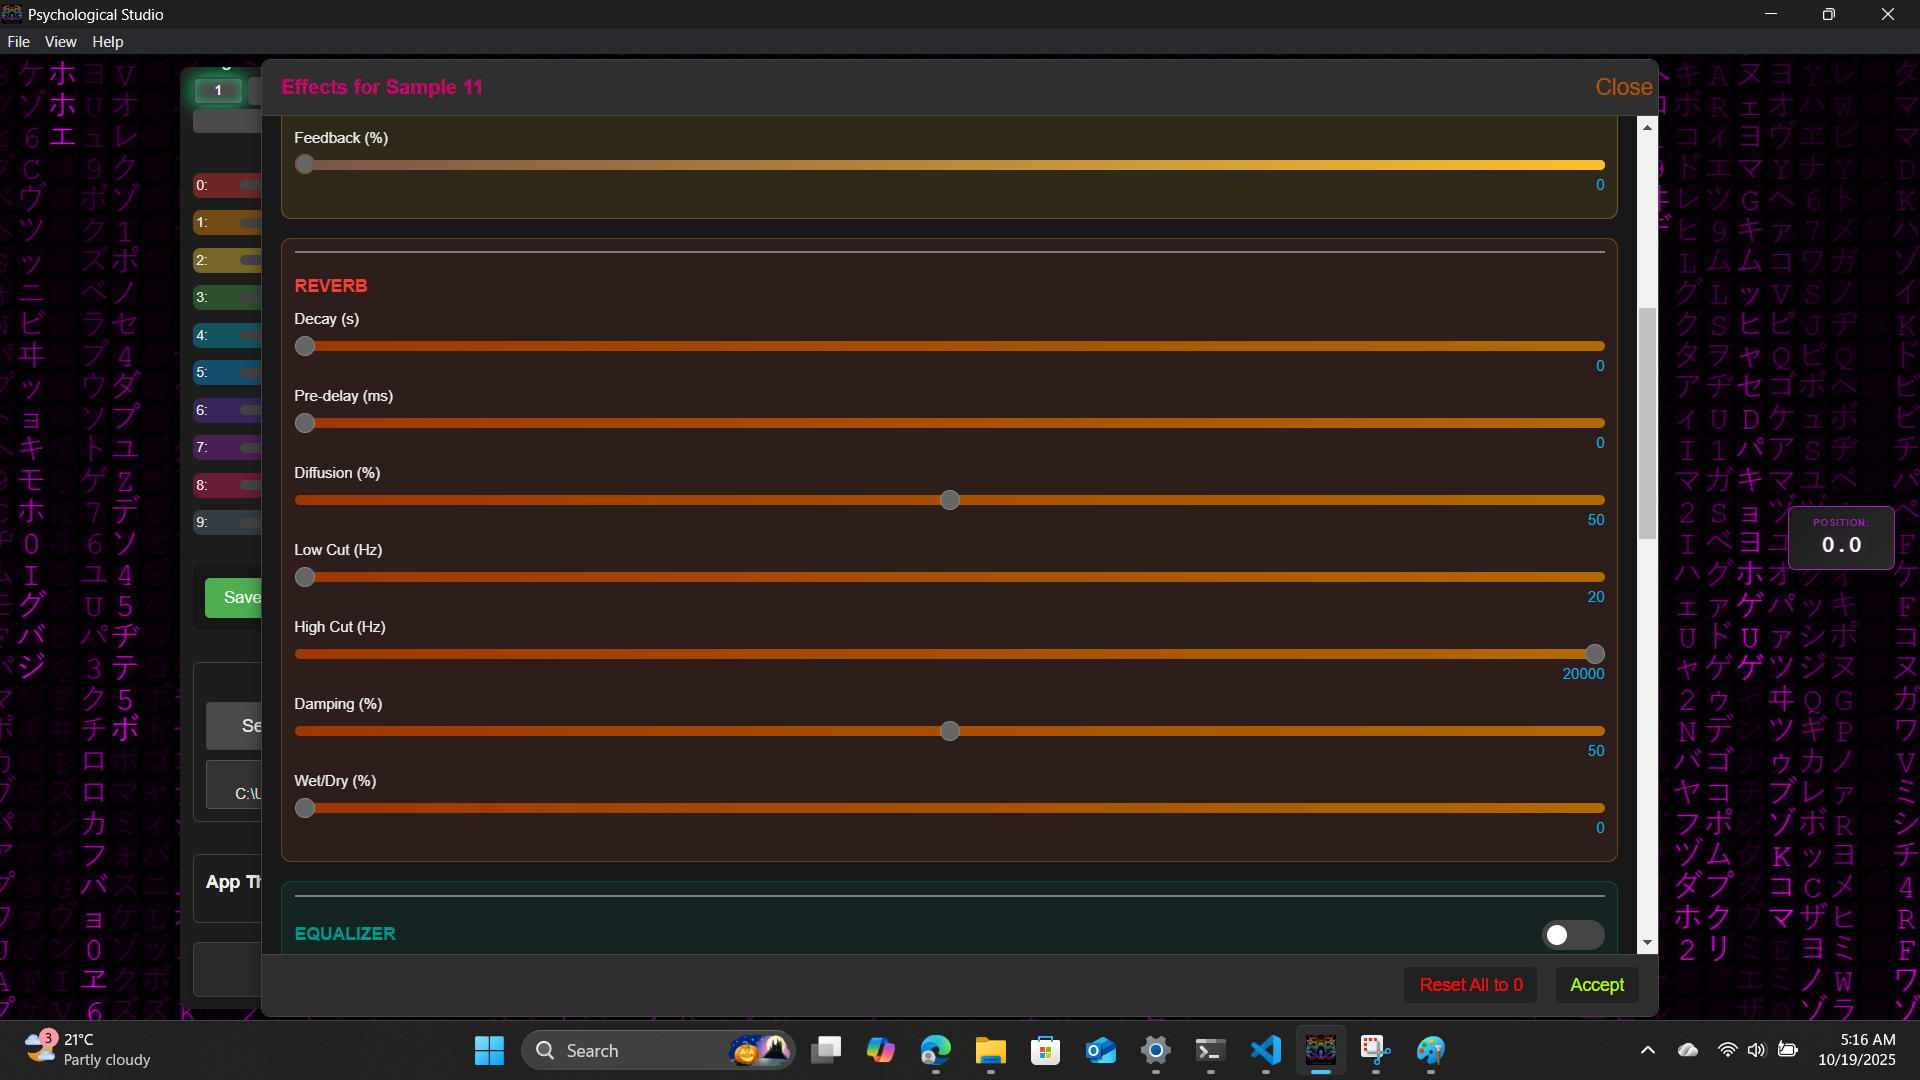
Master Reverb simulates acoustic spaces, from tight rooms to vast cathedrals. Adjust decay time, pre-delay, diffusion, and frequency filtering to sculpt the perfect ambient character for your mix. Essential for creating professional-sounding productions with natural space.
09
Equaliser and LFO's
Frequency shaping and control
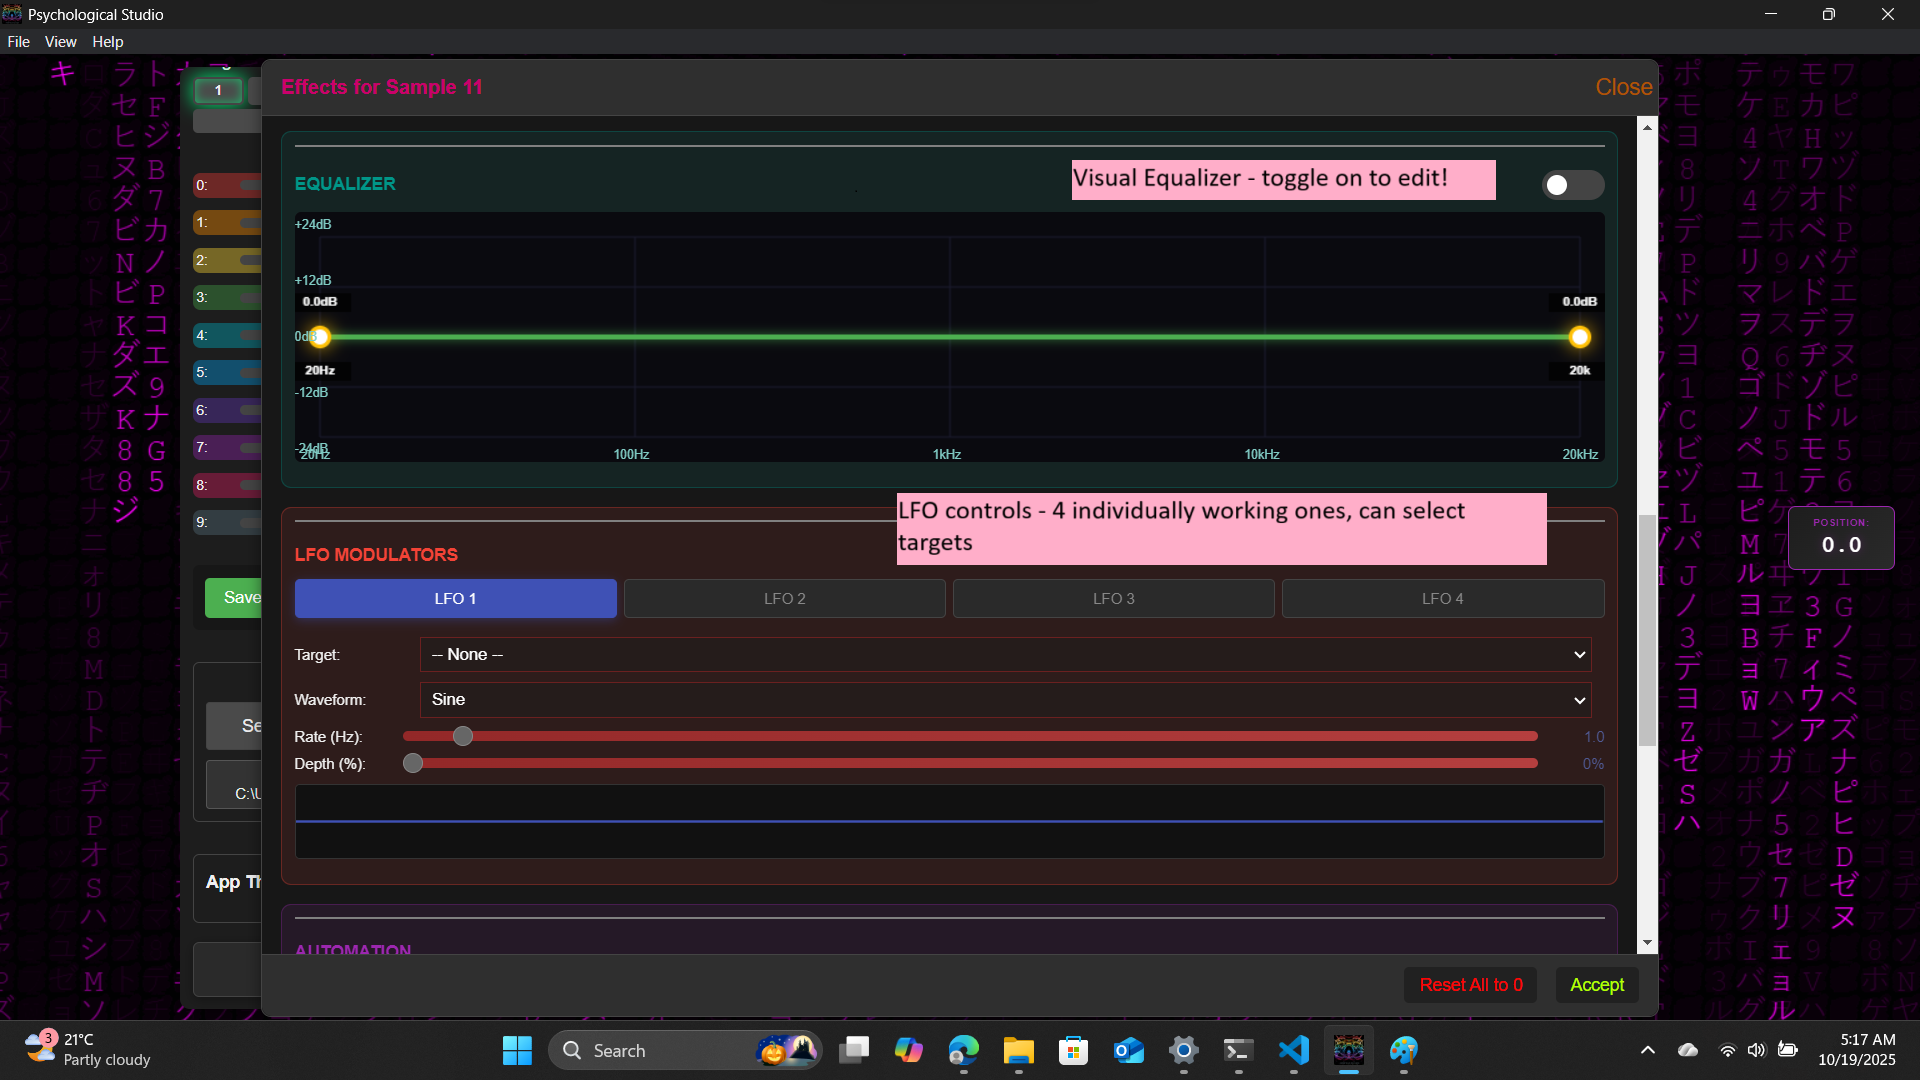
The Master Filter section offers powerful frequency control with lowpass, highpass, and bandpass modes. Adjust the cutoff frequency and resonance to sculpt your mix's tonal character or create dramatic filter sweeps and build-ups.
10
Automations
Individual channel level management
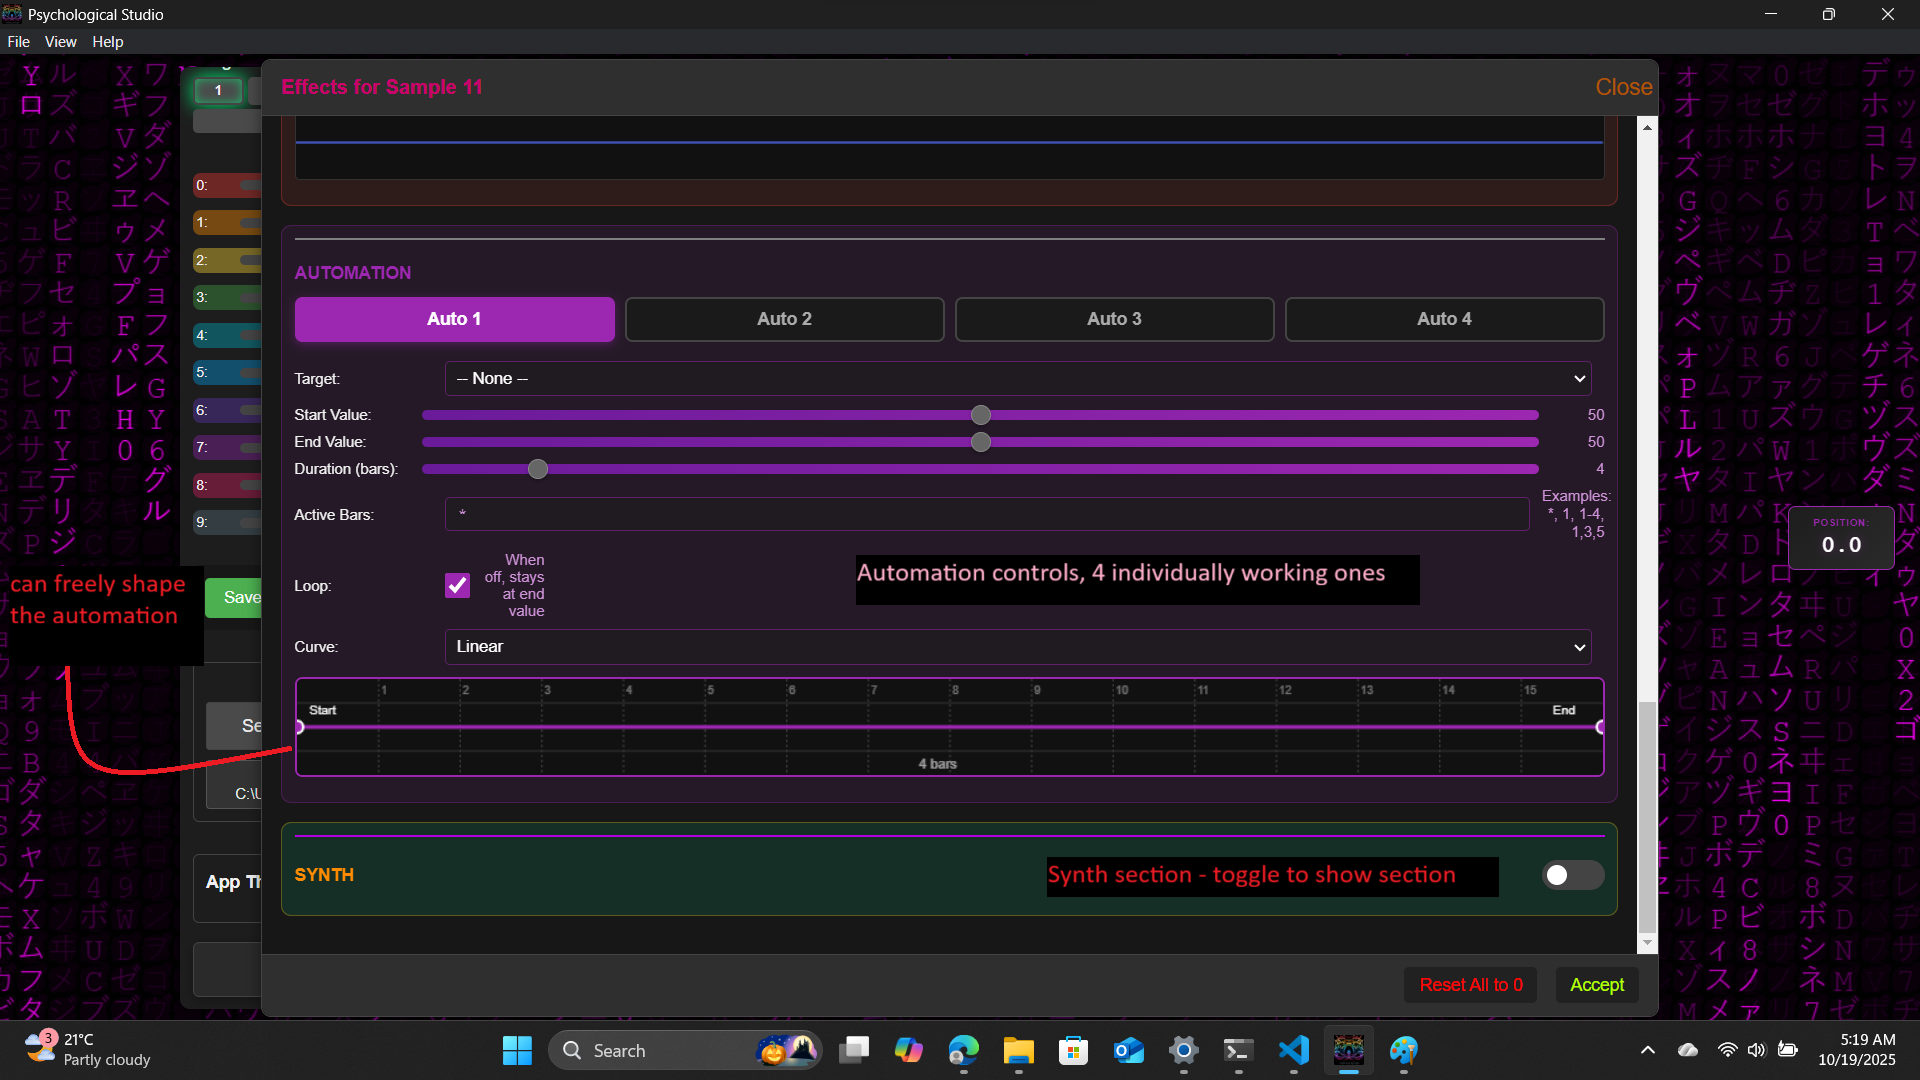
Automate any target with the 4 availabe Automation tabs.
11
Piano Roll with Visualizer
Create melodies and preview your compositions
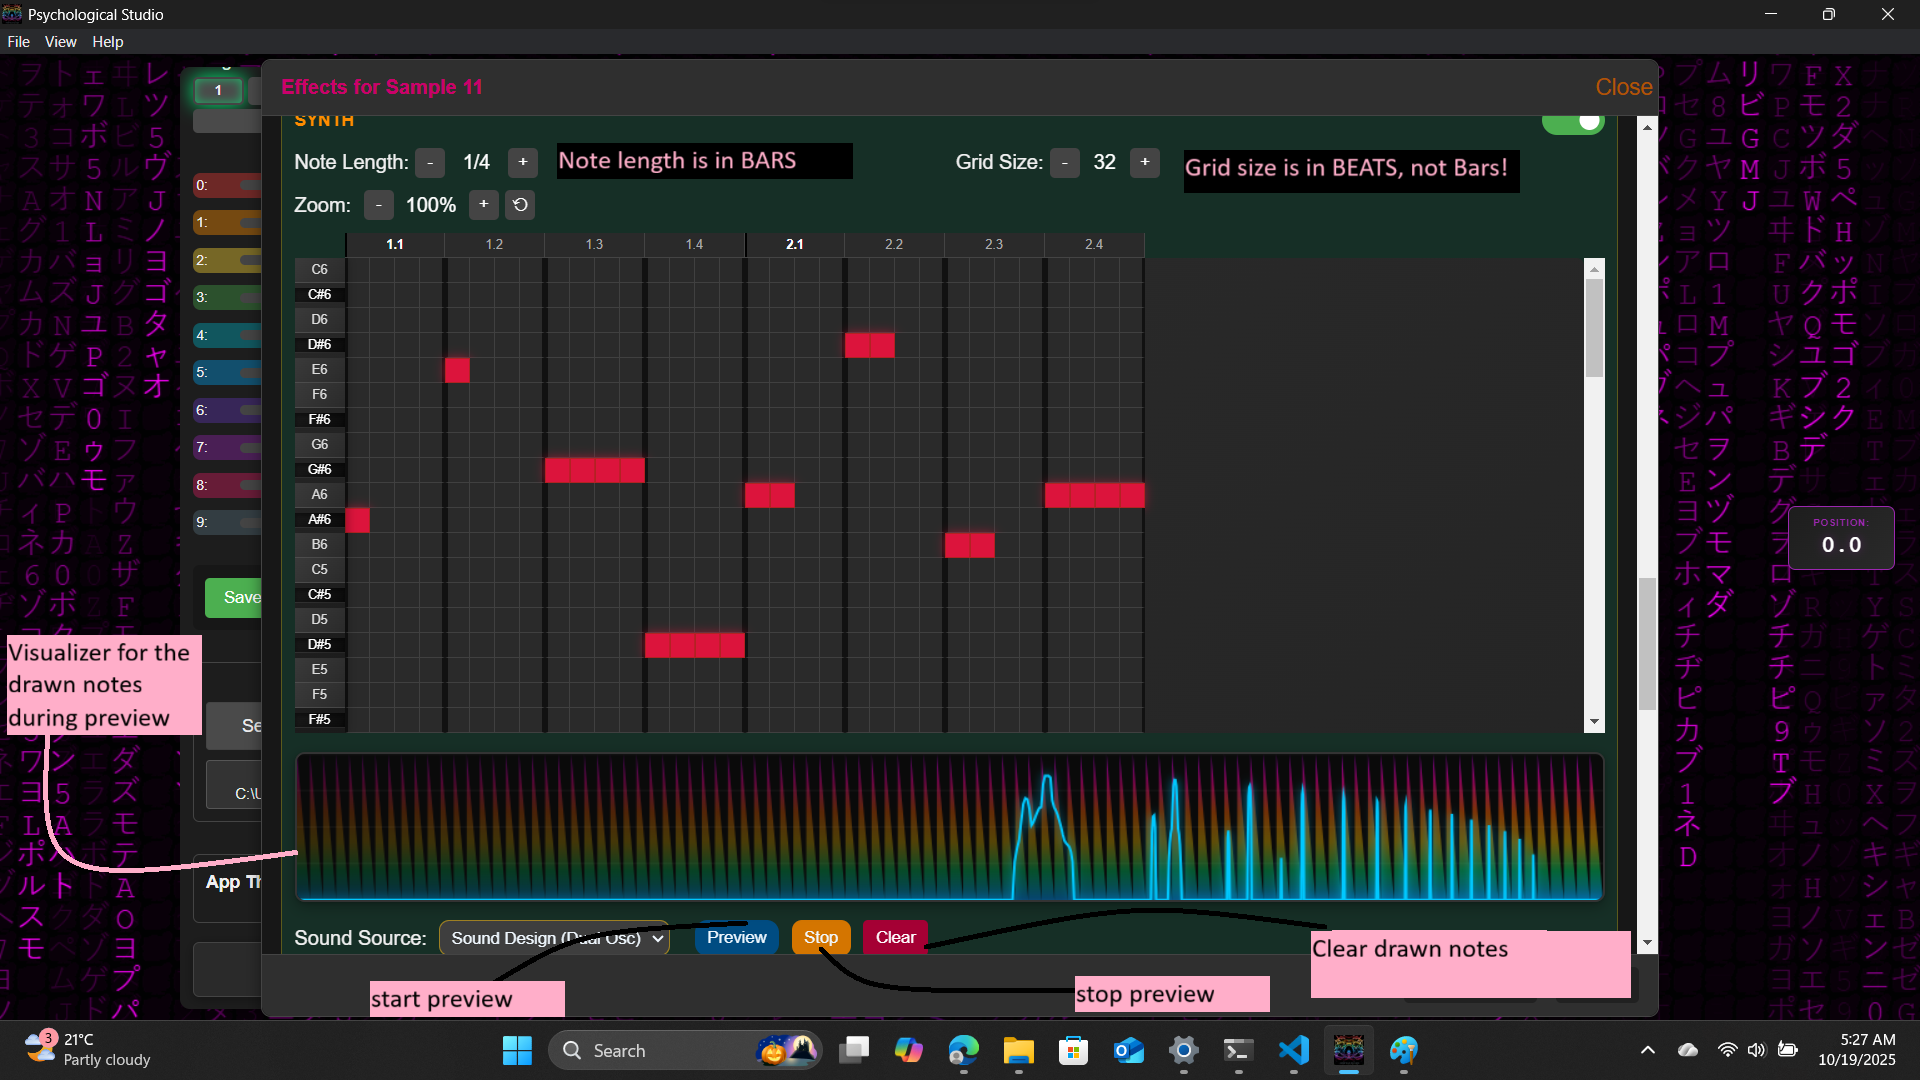
The Piano Roll is the melody creation and sound designing workspace.. Click notes on the piano keys to hear them instantly. The Preview button lets you listen to your melody, Stop halts playback, and Clear removes all notes so you can start fresh. Perfect for composing melodies, chord progressions, and musical ideas.
12
Sound Design Controls with ADSR Canvas
Visual envelope shaping for your sounds
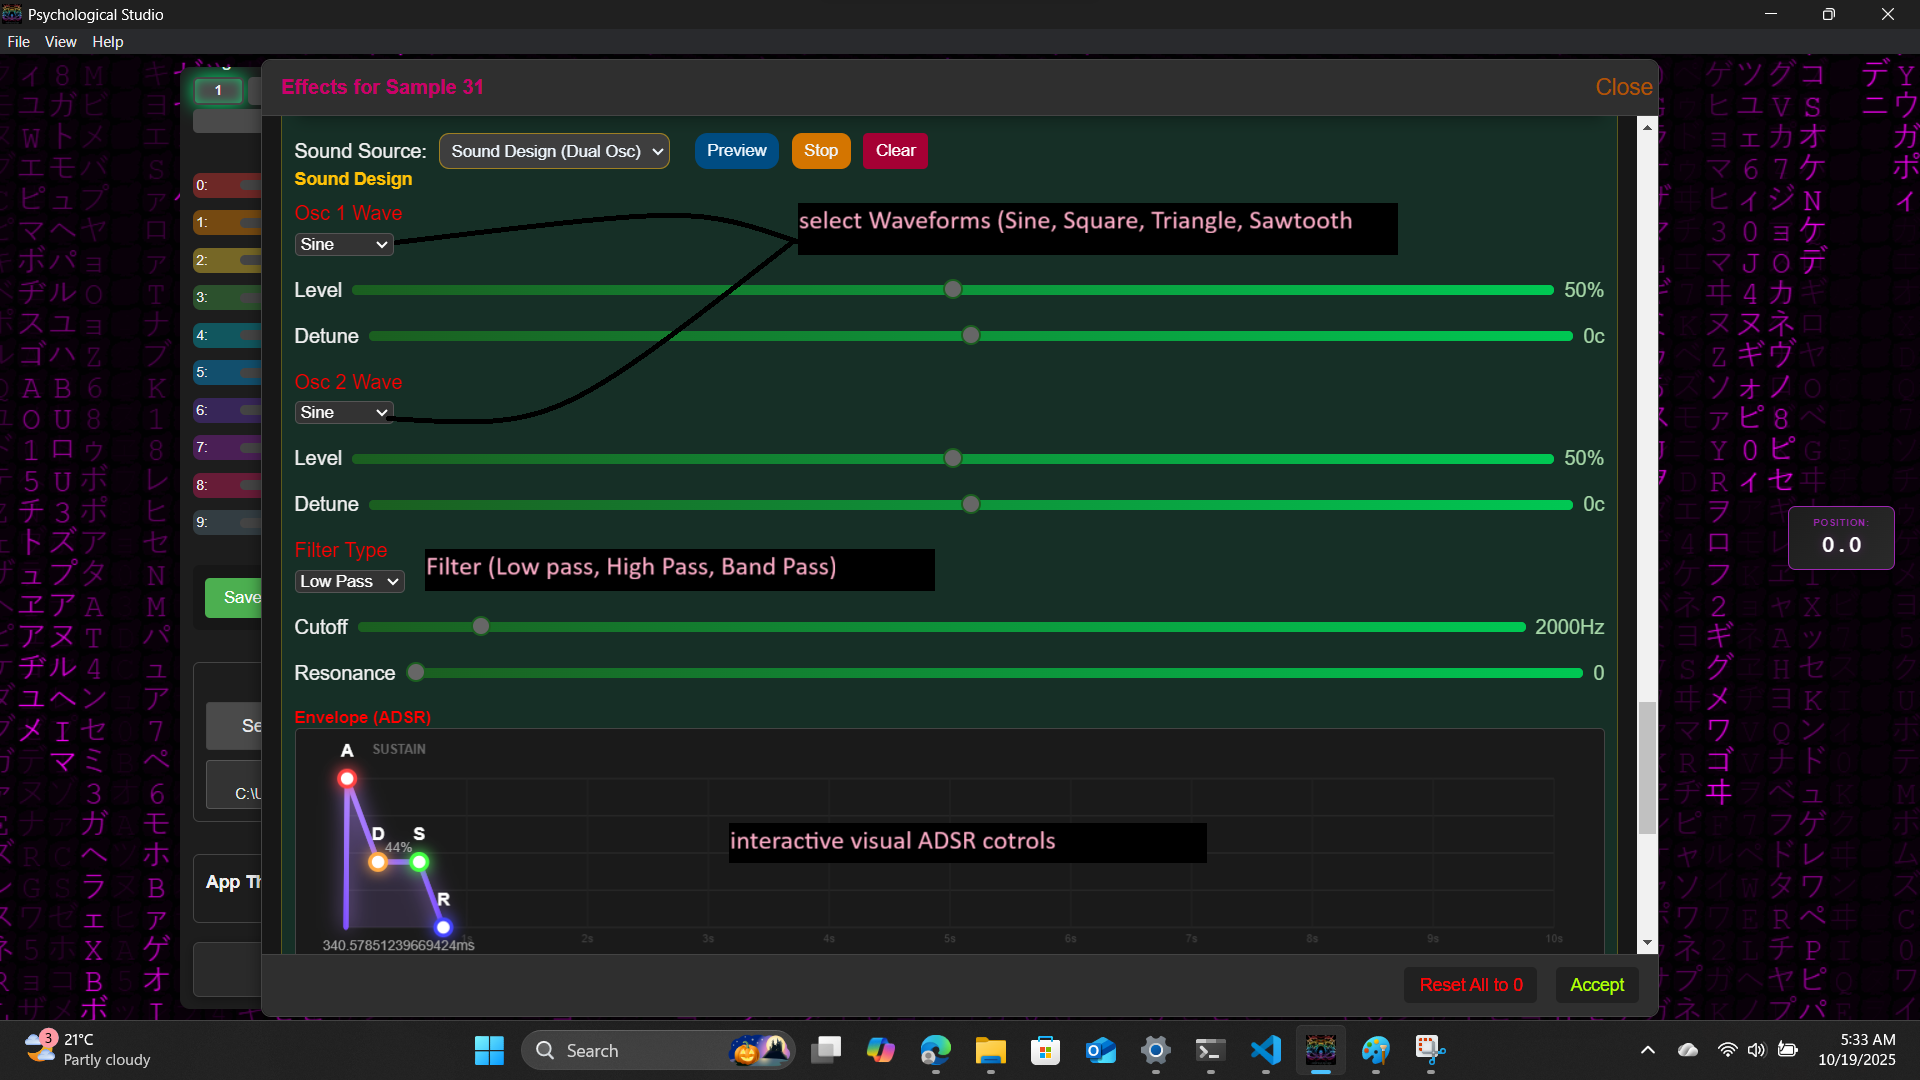
The ADSR Canvas provides visual envelope shaping for professional sound design. Draw your Attack, Decay, Sustain, and Release curves directly on the canvas to shape how your sounds evolve over time. This visual approach makes it easy to create punchy drums, sustained pads, or plucky synths. The interactive canvas gives you immediate visual feedback as you sculpt the perfect envelope.
13
ADSR Sliders, EQ & Delay Controls
Precise parameter control for piano roll sounds
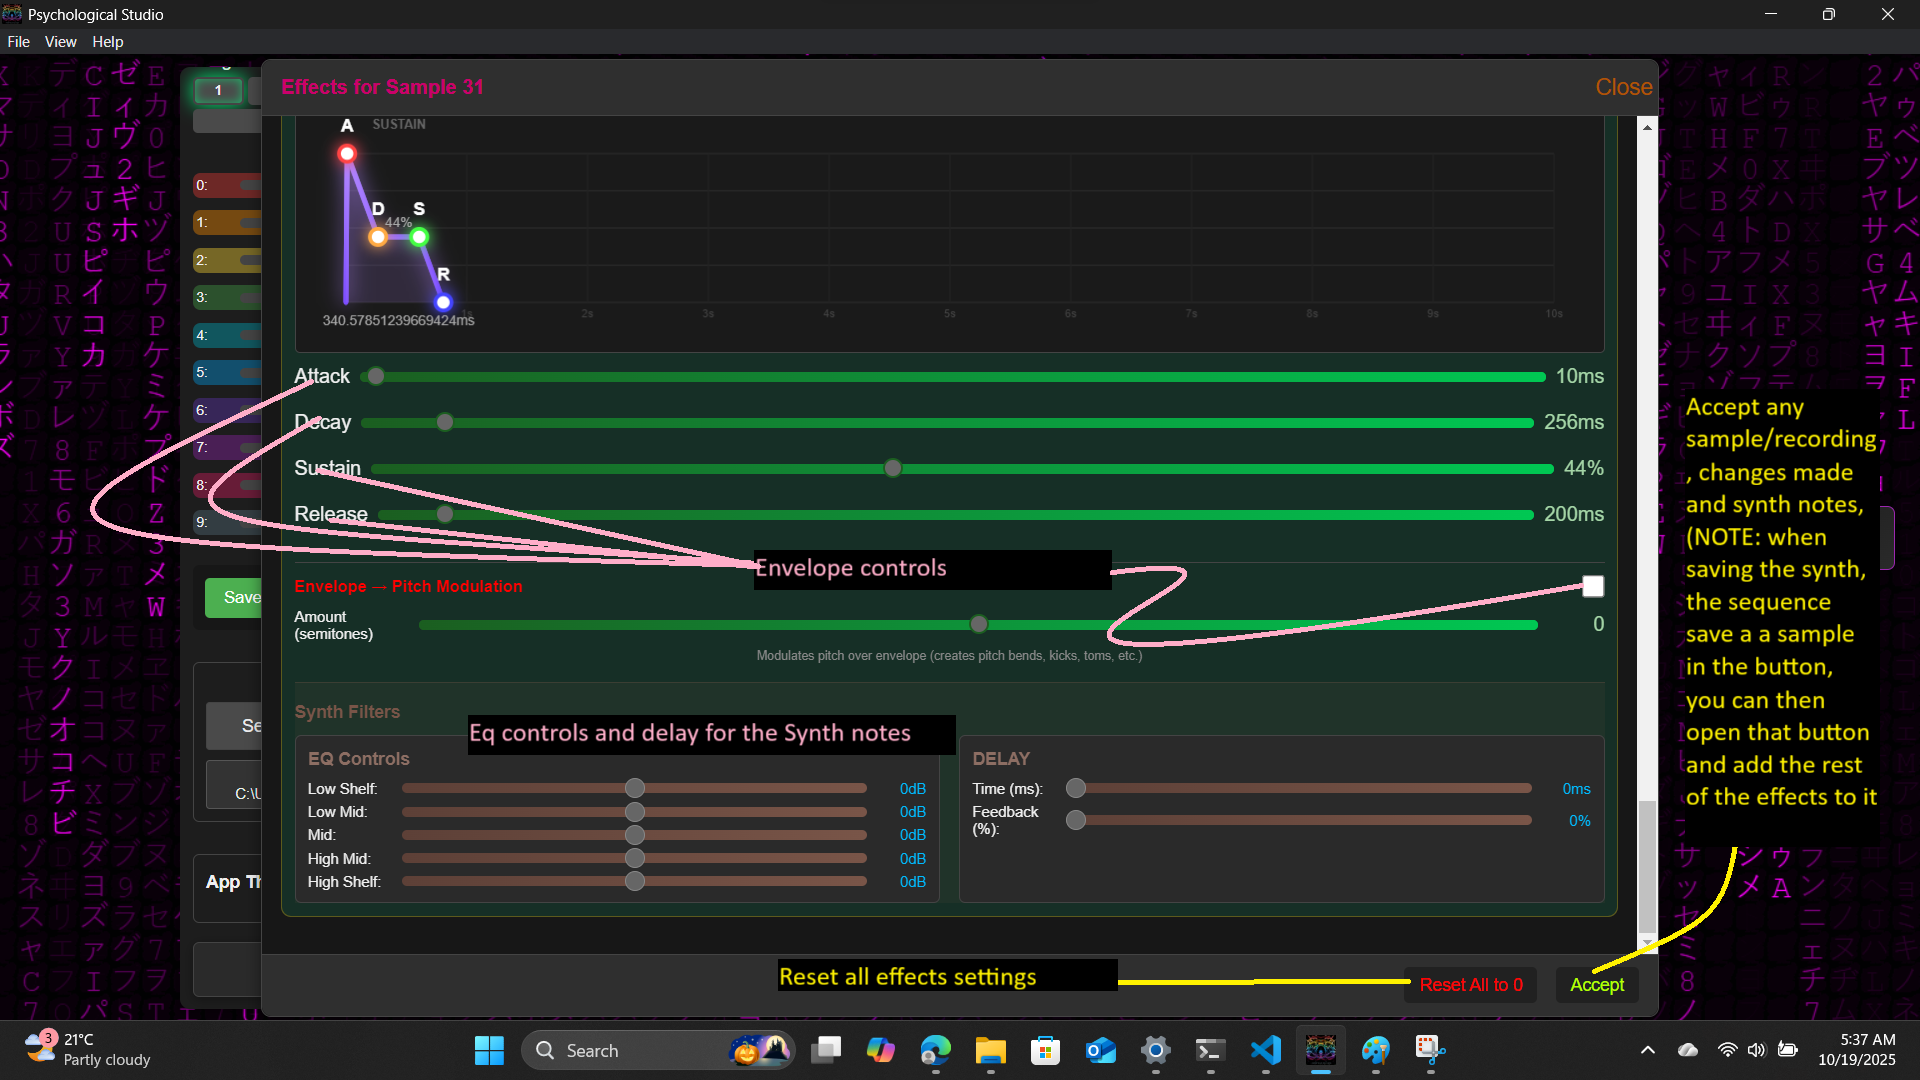
Fine-tune your piano roll sounds with precision ADSR sliders for Attack, Decay, Sustain, and Release. The built-in EQ section allows frequency shaping with lowpass, highpass, and bandpass filters, while the Delay controls add rhythmic echoes and depth to your melodies. These tools work together to give you complete control over your piano roll's sonic character, from tight and punchy to lush and spacious.
14
Speed Info & Tips
Master time-stretching and pitch manipulation techniques

Speed controls allow you to adjust playback rate, affecting both tempo and pitch together. Learn how to match sample speeds to your project tempo, create tempo transitions, and use speed automation for dramatic builds and drops. Each sample can have independent speed settings for maximum creative flexibility.
15
Arrangement Button & App Themes
Access the timeline and personalize your workspace
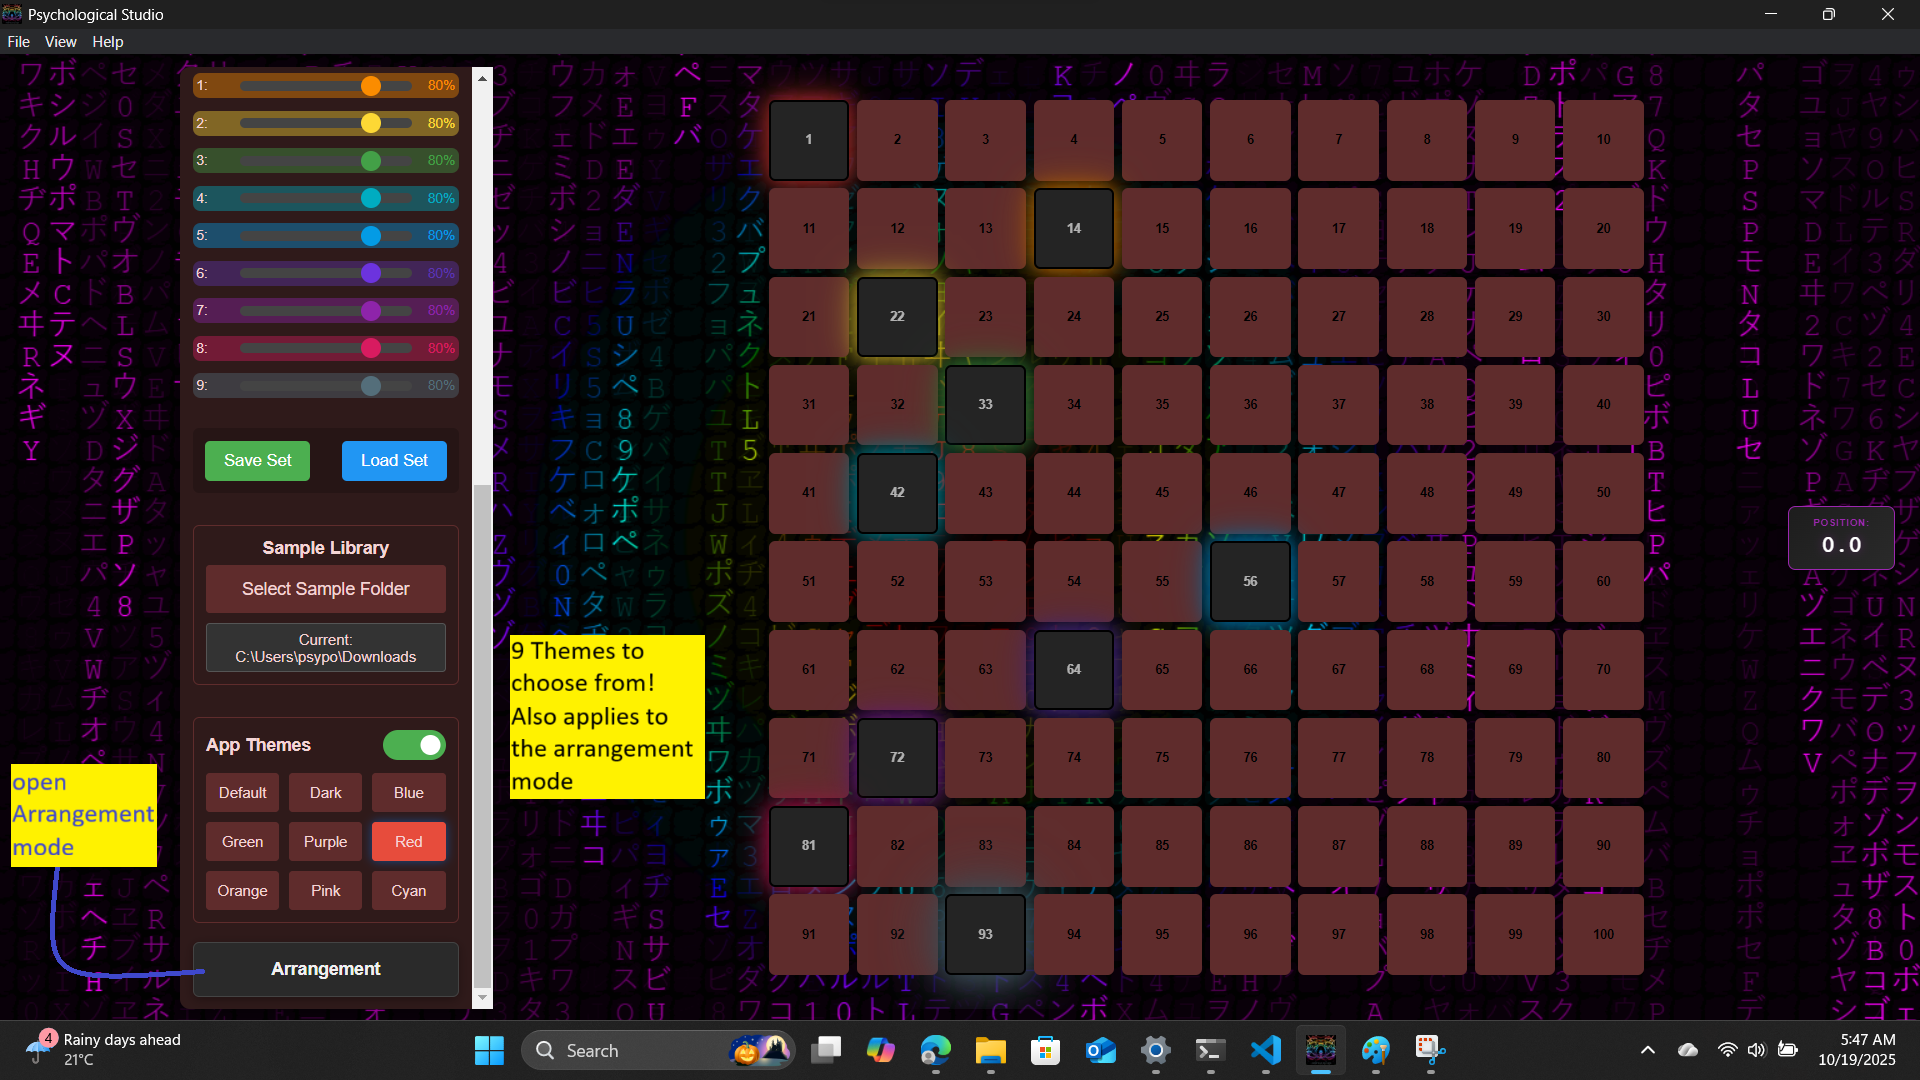
The Arrangement Button is your gateway to the Arrangement Mode (timeline) where complete songs are created. Click it to enter the arrangement workspace where you can place clips, build song structures, and arrange your compositions. The App Themes selector lets you customize your workspace appearance with multiple color schemes - choose dark themes to reduce eye strain during long production sessions, or select lighter themes for clarity and a different vibe. Personalize your DAW to match your creative mood and workflow preferences.
16
Arrangement Mode Interface
Understanding the timeline workspace layout
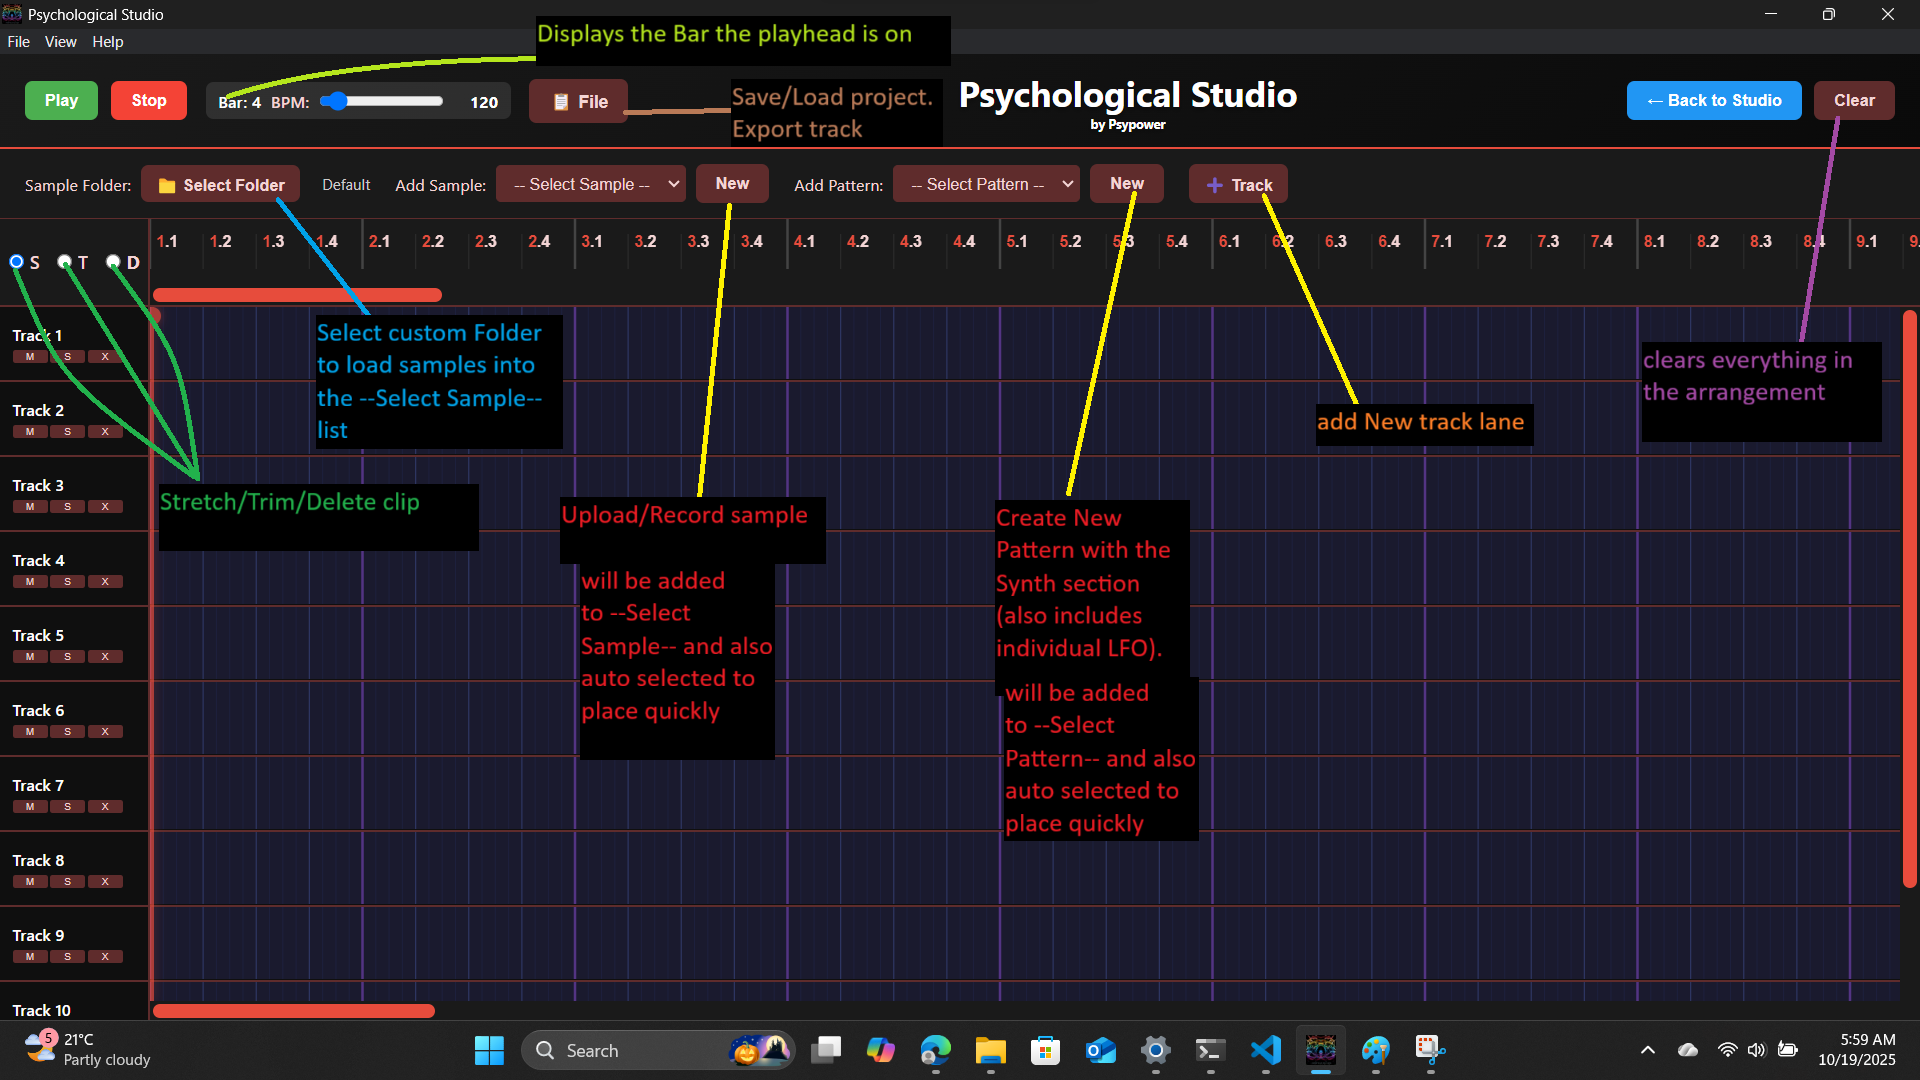
The Arrangement Mode interface is your professional timeline workspace for building complete songs. The interface features unlimited horizontal tracks for layering sounds, a time ruler showing bars and beats, and a playhead that moves through your composition. Add tracks with the "+" button, zoom in/out for precision or overview, and navigate using the horizontal scrollbar. The transport controls at the top let you play, stop, and record. Each track can hold multiple clips that can overlap freely. The interface is designed for intuitive drag-and-drop workflow, making it easy to visualize your entire song structure at a glance.
17
Arrangement Mode - Right-Click Effects & Editing
Access comprehensive per-clip effects and editing tools
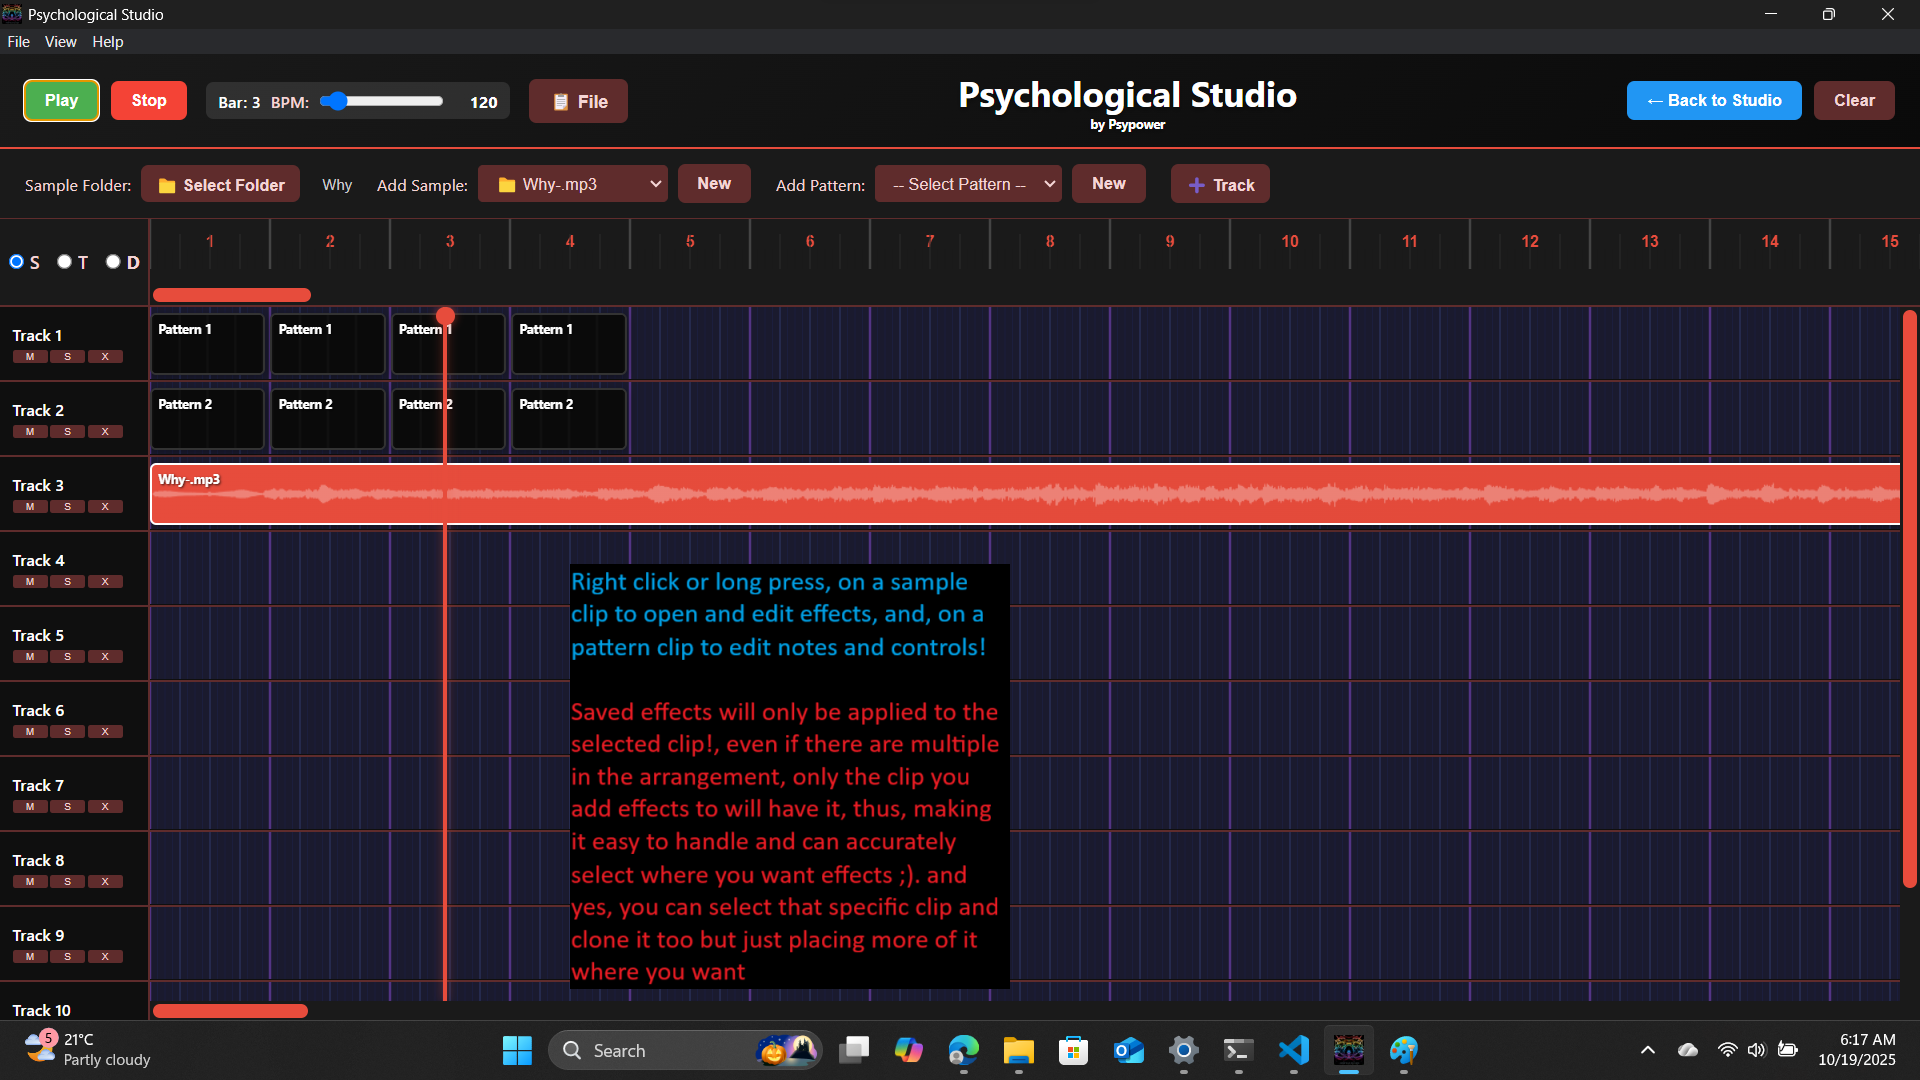
Right-click any clip in the arrangement view to access comprehensive effects and editing controls. This powerful popup provides complete sound manipulation for individual clips without affecting others. The interface features 4 tabs: Basic (volume, speed, delay, reverb, filter with cutoff and resonance), EQ (8-band visual equalizer for precise frequency shaping), LFO (4 independent low-frequency oscillators for modulation and movement), and Automation (4 parameter lanes with curve control for time-based changes). Each clip can have unique effects settings, allowing you to create complex, evolving arrangements with surgical precision. Perfect for creating builds, drops, filter sweeps, and dynamic transitions.